Holidays, Home, Life, Tips and Tricks

How to Make Last Minute Guests Feel Like You’ve Been Expecting Them All Day

I originally wrote this post right before the worldwide pandemic hit. At the time, we had people stopping by all the time, but just as I was going to publish this post, the world shut down and having visitors wasn’t really a thing anymore! However, as we’re all getting back to “normal” life, I thought I would go ahead and post this, especially since we’re heading into the holiday season when entertaining guests seems to be at its peak!

This little bar cart is right inside my front door. It’s usually one of the first places I go to when I know someone is stopping by. I’ll turn on my diffuser, light the candle, and turn on the lamp to instantly add a warm, cozy, inviting feeling to our home.

We’ve all been there. A friend or relative calls or texts and asks if they can stop by in the next 10 minutes. You graciously say “Yes!” but then you look around your home in a panic!

Lately, Alex and I have been lucky enough to have several people stop by our house with very short notice. I know that this can cause stress and anxiety for many people, including myself, so I thought I would go over a few different things I try to do to always be prepared for unexpected guests.

  1. I love to bake. So often, I have some sort of baked good to offer unexpected guests. However, on the off chance that I don’t have something ready, I like to keep some frozen cookie dough in the freezer, so you can quickly throw them in the oven and be pulling out freshly baked cookies as your guests walk in the door! Store bought treats also work in a pinch! When guests come into a house that smells of freshly baked cookies, it will seem like you have been expecting them all day!
  2. I ALWAYS start up my diffuser when I know someone is stopping by. My favorite essential oil to diffuse is Purification by Young Living. It smells so clean and fresh and makes it seem like you’ve been cleaning the house all day! Every single person that comes into my home comments on how good it smells, and it is 100% because of the diffuser and not because of my housekeeping abilities!
  3. Lighting. Lighting can change the feeling of a space so much. First of all, turn on your porch or outside lights! It’s much more inviting to walk up to a house that has their lights on, it’s the first sign guests see that you are ready and waiting for them! Second, I like to keep just warm lights on. Our lamps, and under counter lights are my favorite. Low lighting feels much more cozy and homey than bright overhead lights. Also, light candles! Not only will they help make your house smell great, but they also give an awesome ambiance that helps your home feel cozy and inviting.
  4. Of course, sometimes the struggle is the fact that your house is just plain messy and needs picked up and cleaned. In this case, of course, I try to pick up according to how much time I have. I start in my living room, since that is the first room our guests walk into, and if I have time I’ll move to the kitchen. Always start at the point where your guests will enter and then work from there to the points of the house your guests will likely spend time (kitchen, bathroom, etc.) Close doors to other rooms such as bedrooms, laundry, etc. if you have to.
  5. Play some music! It makes a home seem so cozy when some light music is playing in the background. Of course, don’t have it so loud that conversation is awkward, just loud enough to add to the cozy and inviting atmosphere.

These are just some basic things I do when someone calls and says they’ll be over in a moment’s notice. Hopefully these tips will helps you feel confident to host those last minute guests! What do you do when someone stops by unexpectedly? I would love to hear your tricks too!

Life, Self-Improvement, Tips and Tricks

Getting That “Back to School” Feeling (Even when you’re not in school!)

How was your summer? I trust it went well for you. Mine was great. And busy. (Hence why I haven’t published a blog post in months.) Anyway, by the time mid to late August gets here, I start craving routine.

Summer is so fun and carefree. Trips and vacations, longer daylight hours, warm weather. With all the busyness, I tend to let a lot of my regular habits slide and by the time summer starts to come to a close, I’m ready to get back to it. Remember that feeling when you were in school? You’d get your new school supplies and school clothes and almost be excited to start school back up again. Or maybe you’re still in school! Either way, I think this time of year is a perfect time to reset, make some goals, change some habits, and work on improving ourselves!

One of my favorite podcasts to listen to is the Organize 365 podcast. If you listen to Lisa and are familiar with what she teaches, you know that she considers this time of year one of her “New Year’s.” She breaks up her year into three “new years” and I must say that I completely relate to that! I often feel more motivated this time of year than I do in January to start a new routine, or goal, or habit. I thought you might feel the same, so I thought I’d do a quick post about how to really get that “back to school” feeling even if you (or your kiddos) aren’t even headed back to school.

  1. Get a new planner. When I’m feeling refreshed and ready to restart I always love getting a new planner. There is something so satisfying about filling out a brand new planner. While you’re at it, revamp your schedule! I went through my regular schedule and I’m rearranging things that I think will work better for me. (Like working out in the afternoon instead of morning, etc.)
  2. Meal Plan. There is nothing that makes me feel more organized and like I’ve got it all together than meal planning. It makes it easier to make a grocery list, easier to shop, and I always end up making healthier choices!
  3. Deep Clean. This time of year always makes me want to deep clean and really get ready for a fresh start. This week so far I have deep cleaned my fridge and my pantry. (This also helps significantly when starting a meal plan too!)
  4. Set Goals and/or Make To-Do Lists. I always usually start working on goals around this time of year. Whether it’s eating healthy, working out, losing weight, finishing projects, or planning for the upcoming holidays.

I’m so excited to get into my new routine, accomplish some of my goals, and totally take advantage of that refreshing “back to school” energetic feeling I have. Do you get that “back to school” feeling? What things are you doing because of that? Or what things are you going to do to try and cultivate that feeling? I would love to read your comments about what you’re doing!

Tips and Tricks

How To Enjoy Winter Instead of Just Enduring It

enjoy winter

I think it was about two years ago that I read an article that totally changed my mindset on winter. I have tried to find it so many times since then, to no avail. I really wish I could so that I could share it with you. The article was about how people that live in extremely cold climates, including those that have very few, if any hours of daylight, do not have an increased number of cases of depression. In fact, the article mentioned how these people actually looked forward to winter. As a time of opportunity, and enjoyment. A time to look forward to.

This article has really stuck with me and I think of it often. In the US, it always seems like winter is something to dread, something to get through. There are exceptions for sure. Many people love skiing, and most everyone I know likes some snow and winter weather for Christmastime. But once January rolls around and the bitter temperatures continue in February, most people start complaining and pining for spring.

winter in iowa

I have always loved living in Iowa where we get the opportunity to experience all four seasons to their extremes. Sweet springs, hot summers, beautiful falls, and cold winters. However, a few years ago, I found myself less enchanted with winter. I was a hassle to always have to scrape the car in the morning. A pain to shovel the driveway. So annoying to have to wear a coat everywhere. And as people around me grumbled about the cold, so did I.

cold winter

Then I came across this article and read how people in other countries, countries much colder than it is here in Iowa, looked forward to the coziness of winter. They looked for ways to actually enjoy it, not just endure it until the warmer temps of spring came. I felt so convicted. Here I am in the middle of Iowa (I love Iowa by the way. I wouldn’t want to live anywhere else.) where compared to these extreme climates the article was referencing, our winters are mild and our hours of daylight long. Our winter season much shorter, and temperatures much higher. Yet I was grumbling about the cold. Shouldn’t I be able to look forward to winter and enjoy it as much as the folks living in Norway, Canada, and Russia?

howtoenjoywinter

So ever since then I have tried to be so intentional about finding things to take advantage of during the winter time instead of complaining about its inconveniences. Instead of complaining about the cold, I get to enjoy wearing all my favorite sweaters. Instead of complaining about the snow, I get to wear my new snow boots. I get to build a snowman with my husband. Instead of resenting all the lost hours of daylight, I get to enjoy candlelight in the evening. I read many more books in the winter than I do in the summer, since I often feel guilty about being inside and reading a book while it is a lovely, warm day outside. So I take advantage of the cold to “hunker down” and curl up with a book. This winter I have started to crochet, another hobby I would feel a bit guilty indulging in in the middle of summer. I can bake and cook all day to help warm up the house, whereas in the summer I tend to avoid “heating up the house.” I enjoy more hot cups of coffee, tea, hot chocolate, and apple cider. I get to enjoy watching the beautiful snowfall and the peace and quite that comes with a fresh layer of snow at night. The beauty of the moon reflecting off all the intricate snowflakes.

enjoyingwinter

It sounds like I’m romanticizing winter, doesn’t it? I’m not denying that winter has it’s struggles. Try getting a puppy in mid February. Potty breaks at 3:00 AM are not very fun when it’s 5 degrees. Ice covered windshields, fender benders, slick sidewalks, freezing rain, weather delays, cancelled flights, frozen pipes, and countless more struggles exist because of winter. But there are also so many splendid things because of winter. Ice skating, sledding, building a snowman, icicles, snowflakes, cozy evenings at home, hot drinks, warm sweaters, handmade mittens, any many many others.

lovingwinterboots

I am choosing to look for, and celebrate those wonderfully special things about winter, and resist complaining about the struggles of winter. Keep in mind it is -4 degrees F outside where I am right now and the wind chill is making it feel like -22! But I am inside my cozy home, sitting next to our space heater writing this, so it is okay. I am warm. I am cozy. I am so grateful to have a warm, cozy home.

iowa winter

I encourage you to finish out this winter with a positive attitude. Enjoy the extra time you have to spend inside. Read more. Do more crafts. Cook new things. Enjoy the inside of your home. Work on making your home a place you enjoy. Use all the scarves and mittens and hats that you’ve got. Sit by the fire. (Or space heater that looks like a fireplace in my case.) Make a cup of tea. Start a snowball fight. Use the opportunity to serve your neighbors, shovel their sidewalk, bake them a loaf of bread. Stack up all your cozy blankets on your bed. Wear your favorite slippers and bathrobe around the house. Light some candles. Take a hot bath. Rest. I know that for us, in the summertime we are constantly outside working on projects. Winter is a time for rest. For recharging. For slowing down. Winter is a special time to experience coziness and comfort in a way that no other season brings. I hope this year that you can appreciate all the wonderful things that winter brings and avoid complaining about all the struggles that come with it as well.

how to enjoy winter
Tips and Tricks

How To Get Perfect, Smudge-Proof Valentine’s Day Lips

Valentine’s Day is just around the corner! Are you a lover of all things sweet and red and pink or are you a V-day hater? I have to admit, all of the years I spent single on Valentine’s Day, I was definitely on the hater side. It just wasn’t fun and I didn’t see the point. But being in a relationship has definitely made Valentine’s Day something to look forward to!

Whether you’ll be kissing your someone special this February 14th, or you’re going out for a fun Galentine’s Day dinner with your girlfriends, everyone needs a bold lipcolor to wear for the occasion. In the past, I would have hesitated on wearing a bright red or pink lipstick, especially if I was hoping for a few stolen kisses! How embarrassing to get red smudges all over your face! And what a hassle to have to keep checking your teeth throughout your date. Well, ladies, no more! I have the solution for you and I’m going to go through the process that I use for perfect, smudge-proof, kiss-proof lips that are perfect for Valentine’s Day.

Supplies you will need:

  • a clean cloth
  • a lip scrub – I use LipSmooth Conditioning Polish
  • a Lipsense color of your choice – I am wearing Kiss For A Cause
  • a Lipsense Moisturizing gloss – I recommend the Glossy Gloss

Step 1. Wipe your lips off with a clean, damp cloth. and then dry them thoroughly. You want to start with a clean surface.

Step 2. Scrub your lips with a lip scrub. I use LipSmooth Conditioning Polish. I spread it all over my lips and then rub my lips together until I can’t feel the grit anymore. This step will get rid of any dead skin cells you have hanging around on your lips to give you a nice, smooth surface for your color.

Step 3. Wipe those smooth lips clean. Use just a damp cloth and then dry them well. This is important because Lipsense will actually molecularly bond to your lips and that how the color will last so long. You don’t want there to be any residue (makeup, saliva, etc.) on your lips that the Lipsense will bond to. You want it to bond directly to your lips.

Step 4. Shake up your Lipsense. This step is important. It will mix all of the color particles in your Lipsense so that you get a smooth application and even color. I recommend shaking your tube for about 30 seconds or so.

Step 5. Scrape all of the excess product from your Lipsense wand. You don’t need or want that much product. The magic results are going to be achieved by doing 3 very THIN layers of Lipsense.

Step 6. Assume the position. You want to keep your lips spread apart and stretched out so that you don’t have any wrinkles or lines in your lips so that you can get a very even application of color.

Step 7. Apply your first layer of Lipsense. Use only a single stroke going in one direction. Do not go back and forth. I start at the middle of my upper lip and go down one side. Then I go back to the top and do a stroke down the other side. Then I do a stroke across my bottom lips. I also do a stroke on the inner part of my lip, the “waterline” to get every part of my lip a thin, even coat of Lipsense, without going back over what I have already done.

Step 8. Let your first layer dry. This takes about 10 seconds. Not long at all, but it can sometimes feel like a long time when you are in a rush to put your face on. But trust me, the 10 second wait time is worth it in the end when you get 12 plus hours of smudge free lipcolor. After about 10 seconds or so, I usually just touch my lips with my finger to check that it is dry. If it is, continue to Step 9, if it isn’t, let it dry longer.

Step 9. Apply your second layer. Use the same technique as you did for layer 1. The reason you apply 3 layers is because layer 1 will get naturally broken down by your body. Layer 3 will get broken down by your saliva, food, napkins, kissing, the environment, etc. So layer 2 is protected in between those two layers and is how your Lipsense color will last all day!

Step 10. Once layer 2 is dry, repeat for your third layer and let your third layer dry.

Step 11. Time to gloss! Take your glossy gloss and gloss away! There is no special technique to this part, I just like to apply a LOT of gloss right after application.

Step 12. Enjoy your gorgeous, smudge-proof lips! Remember to keep applying your gloss throughout the day for hydration, and also protection. I like to gloss before and after I eat, and whenever my lips feel like they could use more moisture.

I hope you are not overwhelmed by this process! Once you get used to it, it take just a couple of minutes, which is totally worth it in order to have beautiful, smudge-free lips all day!

I hope you all have a great Valentine’s Day and get lots of kisses! XOXO

Tips and Tricks

The BEST Way to Remove Store Stickers from Products

We’ve all been there. In the clearance aisle. You just hit gold with the markdowns you found. You are so proud of yourself as you take your treasures home. Only to realize that the store has placed about 12 markdown stickers right on the front of your product and they are STUCK! You then spend an hour picking and peeling. You ruin your nails (as seen in the photos)  And for what? A gross, sticky residue left on! Then you scrub with soap and water and it still lingers! Ugh! Well my friends, no more. I have found the answer to getting those sticky clearance stickers off pain free!

I found these perfect little glass containers to pack my lunches in, but of course they had dreaded stickers on them. I, however, did not dread taking off these stickers, because I have found a super easy, super quick solution!

First, you will need some lemon essential oil. I use Young Living. Just from research that I’ve done on essential oil, they seem to be the best quality brand, but that is also the only brand I’ve ever used. I know some people have very strong feelings about their essential oil brand, and I do not claim to be any expert, I’m just telling you what I used, and that’s Young Living. If you use a different brand, I would certainly recommend trying it for this, as I would assume it should work just as well.

Okay, so take your Lemon essential oil and just place a few drops over the sticker. I usually just do one to two drops depending on the size of the sticker. Just make sure the whole sticker is covered with the oil and if necessary, spread it around with your finger. Then just let it sit there awhile. Go do the dishes or the laundry or something. Or sit on the couch with a cup of coffee. Later, once you’ve been productive enough, or have consumed enough caffeine, check out your sticker and see how it looks.


I find that a lot of stickers come free with the lemon oil alone if left to sit for long enough. The sticker should be completely loosed from the product and you should be able to just lift it off and wash off the excess oil from the product. If you have a particularly difficult sticker, or still have a bit of sticky residue when you lift the sticker, place a dollop of dish soap on the area and rub it in with your finger and it should come right off!

Crafts, Gift Ideas, Tips and Tricks

Date Night At Home Gift Basket

Well, it’s only 5 days until Christmas! Have you got all your gifts bought? No? Need some inspiration? I hear you. I give you (drumroll please) the romantic date night at home gift basket!

Gift baskets are one of my favorite things to put together and give! See example here.

Gift baskets are wonderful because you can adjust their contents depending on your price range, plus they are just adorable in general and so fun to put together.

This year for Christmas I decided to make this gift basket for Alex’s parents. I wanted the theme to be “romantic date night at home” which was inspired by a floating waterproof Bluetooth speaker that I found for them that I thought would be perfect for their hottub. (Now obviously I know that not every has a hottub, but that is why gift baskets are so great! You can personalize them for whoever you’re giving them to!)

Anywho, here’s what I put in their basket. I just picked things that I thought they would enjoy using on a night at home with eachother. You could definitely adjust these items to fit the personality of who you’re gifting it to, but for the most part I think all of these things are pretty well liked universally so it makes a great gift no matter how well you know the couple. (Side note: this is also a great way to gift a couple instead of each person individually! Two for one! Yay!)

  • Waterproof floating Bluetooth speaker (for hot tub!)
  • A candle (for ambience)
  • Bottle of wine (duh)
  • Matching slippers (to wear to hot tub!)
  • Ingredients for a romantic Italian dinner: pasta, pasta sauce, garlic cloves, garlic flavored olive oil, garlic powder grinder (I like garlic okay!?!)
  • A movie (for snuggle time)
  • Dessert: I chose different varieties of chocolate truffles and pirouette cookies

A Christmas basket and Christmas sign (for holiday cheer!)

I hope this gives you some inspiration! Here are some other ideas of items you could put in your date night gift basket:

  • A blanket
  • Matching robes or pajamas
  • Chocolate covered strawberries
  • Champagne
  • Fresh flowers
  • An album, iTunes gift card, or CD for some romantic tunes
  • Lotion or massage oil

Have fun putting together your gift basket!

Crafts, Gift Ideas, Tips and Tricks

Thanks for “Bee-ing” So Sweet Gift Basket

I purchased a house two months ago now. I can’t believe it’s already been two months!  Anyway, my house is conveniently only three doors away from one of my very best friends from high school! I still can hardly believe my luck. I knew that living so close to Liz and her husband would be so fun and exciting, but I never could have dreamed what incredibly generous neighbors they would be.

The night I moved in, I went out to dinner with Alex. I didn’t rush right home because honestly, I was a bit nervous and scared to be in a new place all by myself. But I needn’t have worried. When I got home I found a beautiful gift basket on my front steps.  
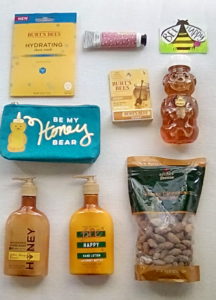
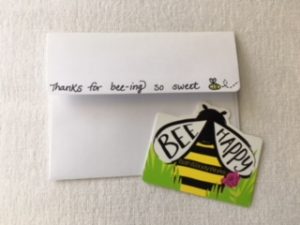
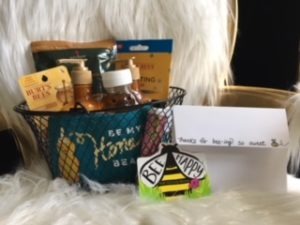
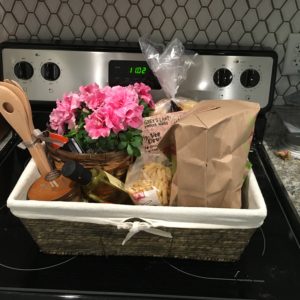
It was so incredible and generous! I was blown away and completely comforted knowing I had such great friends so close by.

Then just last week I came home from work to find Liz mowing my grass, raking my leaves, and filling up five bags worth of twigs and leaves! With all that she’s done for me, I knew I wanted to do something special for her to show my appreciation, but what? I didn’t have a clue until I came adds this cosmetic bag from Bath and Body Works.

I couldn’t not buy this bag! I instantly envisioned the gift basket I could make with it. While I was at the Bath and Body Works store, I also bought some honey hand lotion and honey soap (pictured inside the bag) as well as a “bee happy” hand cream! They also had adorable “bee happy” gift cards, so I had them load one of those up so Liz could get some things of her choice too.

Then I bought a honey bear of local honey, some Burt’s Bees honey lip balm and face mask, as well as some honey cinnamon almonds.

To tie together the theme I just used a plain notes are that I already had that sort of matched the cosmetic bag. I drew little bees and colored them in with colored pencils, and wrote “Thanks for bee-ing so sweet” .

Once I finished, I stuck everything in this adorable little basket that came from the dollar store! (Shhh…..don’t tell Liz).

This basket was so much fun to put together! I hope this gave you some ideas on how you can brighten someone’s day. If you can’t find a cosmetic bag to go with this theme, that’s okay! This basket would still be adorable without it. Some other ideas of things you could pick in this basket would be more variety of Burt’s Bees products, baked honey cookies, sugar cookies decorated like bees, a honey pot, honey sticks, Winnie the Pooh products, or really anything that you love or think is cute!